The Quick Launch toolbar was a handy feature in earlier versions of Windows, allowing users to launch frequently-used apps quickly. Although it was removed in later versions, you can easily bring it back in Windows 10. In this guide, we’ll walk you through the steps to add the Quick Launch toolbar back to your taskbar.
Step 1: Right-Click on the Taskbar
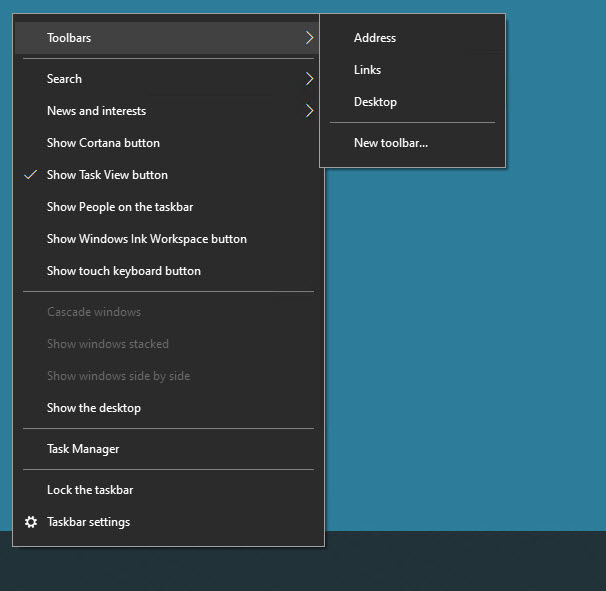
Start by right-clicking on any empty space in the taskbar. This will open a context menu with several options.
Step 2: Open Toolbars Menu
From the context menu, hover over the Toolbars option. A submenu will appear with a list of available toolbars.
Step 3: Add a New Toolbar
In the submenu, click on New toolbar…. A “File Explorer” window will open, allowing you to select a folder for the new toolbar.

Step 4: Enter the Quick Launch Folder Path
In the File Explorer window, copy and paste the following path into the address bar and press Enter:

%APPDATA%\Microsoft\Internet Explorer\Quick LaunchThis path leads to the original Quick Launch folder used by previous versions of Windows.
Step 5: Confirm the New Toolbar
After you press Enter, you’ll see the Quick Launch folder appear in the window. Click the Select Folder button in the bottom-right corner to confirm.
Step 6: Adjust the Quick Launch Toolbar
You’ll now see the Quick Launch toolbar on the right side of the taskbar. To move it to its traditional spot next to the Start button, follow these steps:
- Unlock the Taskbar: Right-click on the taskbar again and click Lock the taskbar to uncheck it.
- Move Quick Launch: You’ll notice small vertical lines to the left of the Quick Launch toolbar. Click and drag those lines to move the Quick Launch toolbar to the left, just next to the Start button.
- Resize Icons: To show smaller icons, right-click on the Quick Launch toolbar and click View > Small icons.
- Remove Text: Right-click again on the Quick Launch toolbar and uncheck Show text and Show title to make it look cleaner.

Step 7: Lock the Taskbar
Once you’re happy with the placement and appearance of the Quick Launch toolbar, right-click on the taskbar one final time and click Lock the taskbar to prevent any further movement.
Bonus: Adding Icons to Quick Launch
To add shortcuts to the Quick Launch toolbar, simply drag and drop any app or file onto the toolbar. It will automatically create a shortcut for quick access.
Conclusion
And there you have it! You’ve successfully brought the Quick Launch toolbar back to Windows 10. This small but useful feature can save you time and make navigating your computer a breeze. Enjoy the convenience of quick app access, just like the old days!